Please read this page in full and check size, frames, glass and ancillaries prior to commencing or arranging an installation.
You can find a downloadable version here if you wish to print it.
All windows and doors are checked before they leave the factory, however please check your goods to ensure they are the correct size and style and operate easily. To ensure an accurate test on side hinged openers, including doors, lay the frame flat horizontally to test operation.
If you are unhappy with any part of any part of an item supplied, do not begin the installation, contact us on 01777 594131
Any shortages or damages need to be reported immediately upon delivery. Any items reported missing or damaged after this time will be deemed chargeable.
It is well recognisable that over 90% of remedial work is due to incorrect installation. Any information on this page is intended as a basic guide to installation. We cannot predict every type of installation that may be encountered. If you are unsure of any of the installation process then seek an installation expert to install for you.
PREPARATION
Check the size, style and hanging against your order before removing any existing frames, check opening sizes.
Remember, your new door should be approx. 10mm smaller in height and width than the brick opening!
When you are happy with the goods supplied, you may begin to remove the old window and/or door. If you are fitting various zes of window, we suggest you start with the smallest window first complete the installation process before moving onto the next. Firstly, remove the existing glass/frame.
When the aperture is completely clear and clean of the old frame and removed from the working area, ensure that the opening allows for a square installation with a minimum of 5mm all around the frame. Do not leave any uPVC door panels in direct sunlight, as the protective film could bond to the skin.
Where are my keys?
UPVC French Doors – Inside the glazing aperture.
Windows – Inside the opening sash
INSTALLATION
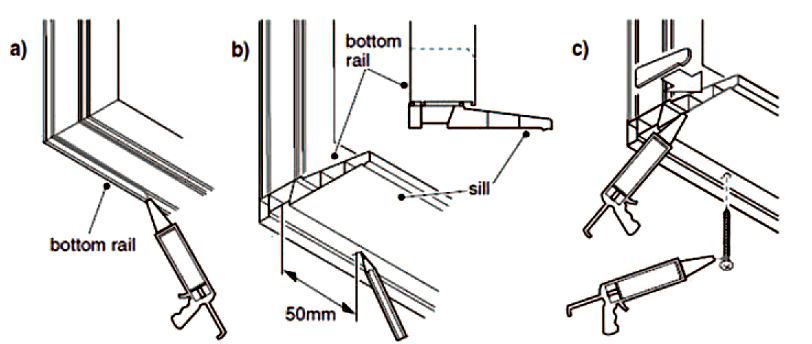
1. Installing the Cill
a) Apply a bead of an all-purpose silicone along the inner raised edges on the bottom rail of the frame (taking care not to block the drainage holes) and position the cill onto the frame.
b) Measure a distance of approximately 50mm from each end of the cill and mark with a pencil.
c) Drill through the cill and the frame at the marked positions and fix with 50mm self-tappingscrews.
d) Coat the ends of the cill with silicone sealant and push the end caps into position,
2. Installing the frame.
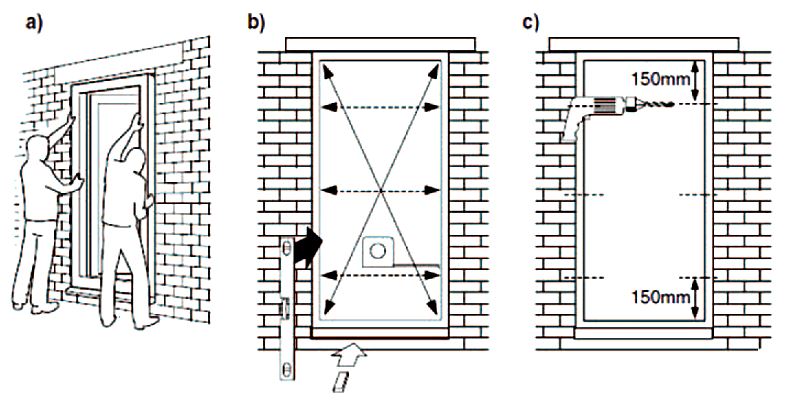
a) Offer the frame to the opening and place firmly into aperture.
b) Place equally spaced flat packers under the till to ensure that the frame is level. Check that the frame is plumb and square by using a spirit level and measuring the frame diagonally from corner to corner to achieve an equal measurement. Check that the frame is not bowed as this can cause problems later in the installation_
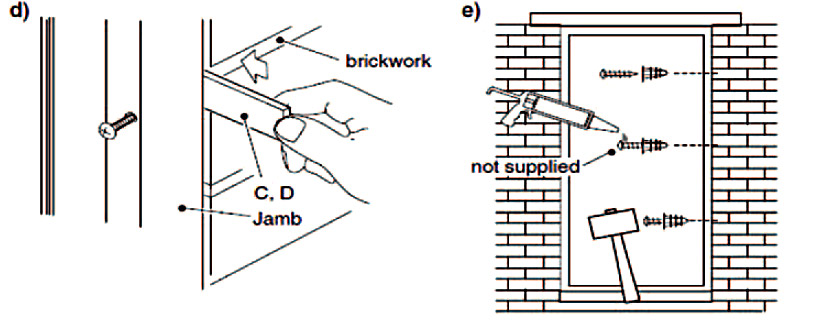
c) Using a high speed drill bit, drill pilot holes through the frame towards the brickwork on both the verticals. The holes should be approximately 154mm from each corner and further holes 300mm apart. Change to a masonry drill bit and continue drilling into the brickwork to the depth required to suit the wall fixings.
d) Insert flat packers where required between the frame and the wall to ensure that the jambs remain plumb.
e) Fix the frame using suitable fittings applicable to the type of wall construction, taking care not to distort the frame when tightening {check the frame width regularly to ensure that the frame is even.)
Re-check the installation as in b) before continuing.
3. Fitting the sealed units or panels.
a) Using a flat edge scraper insert the scraper into the OUTSIDE edge of the bead where it touches the frame a gap should appear and the blade will seem to go into the frame. You will need some force to insert the blade between the bead and frame (a lever action sometimes helps from side to side.)
Once started, push the scraper handle flat to the frame and run the blade up and down the bead, this should release the bead, if the bead does not pop out simply ned it from the middle and it will release, once out write on the bead where it came from top, left etc, the beads must be returned to the correct position. With all the beads out, the glass unit/panel needs to be held in with glazing packers (see toe and heeling section point 4.)
b) Place the new glass unit/panel in the frame/sash and using glazing packers wedge the glass unit/panel in square and make sure that you have the glass unit/panel right back against the rubber seals on the outside of
the frame (it will leak if you don’t.)
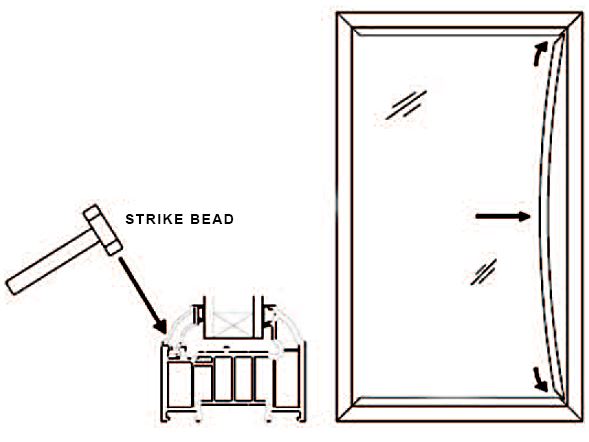
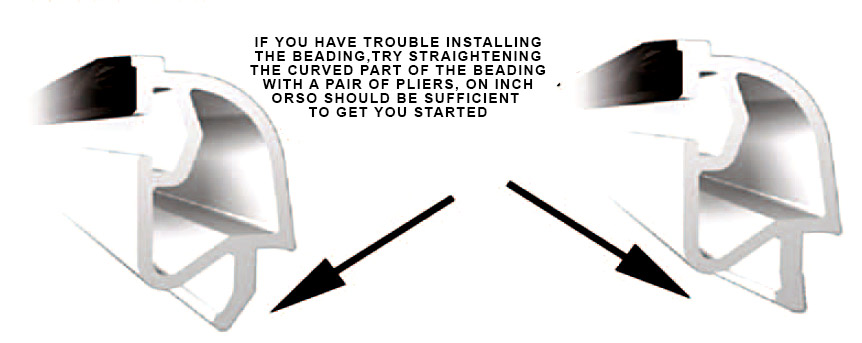
Ensure that you have the correct bead, insert a corner of the bead and push it right into the corner of the door using a bending action at the middle of the bead insert the other end of the bead into the other corner and push the middle of the bead into the frame, using a plastic or rubber mallet tap the bead into place so that it sits flush all the way along the bead edge and the frame, (it should go in as it was before you started)
All you have to do now is repeat so that all the beads back to the original places.
Fitting the glazing bead Tips
If you are having trouble getting the beads out, just take your time and persevere until the gap opens for the blade to go in. You may find the beads slip out of the corners when you are putting them back in, again take your time and don’t forget to bend the bead to get the other end in. A sharp strike to the rounded corner should get it back in DO NOT USE AN ORDINARY HAMMER IT MAY CRACK THE BEADS.
If the bead doesn’t look or sit properly just remove it and start again.
4) Toeing and Heeling
What is Toeing and Heeling and why do it anyway?
UPVC doors are heavy, and although the dead weight is supported on the hinge side when it is opened, there is nothing on the lock side to support the weight, and without the procedure of toeing and heeling the door will ‘drop’ on the handle side, sooner or later. To stop a door dropping the glass/panel itself has to be braced diagonally corner to corner by the insertion of plastic packers slipped in the gap between the glass/panel and frame, under the beading. On the hinge side the packers go at the bottom corner, whilst on the lock side, the packers go at the top (opposite) corner.
To explain further – picture this in your mind, look at or visualise the back of a normal wooden side gate and you will see three ‘ledges,’ that is the horizontal planks-one top, one middle and one bottom.
These ledges are used for the diagonal planks of wood to sit on so as to brace across and therefore to stop the gate dropping on the lock/handle side.

So does my door need toeing and heeling?
When a uPVC door has ‘dropped’ the first thing people usually notice is that the lock is not working as easily as it did, or will not lock at all. The door may also possibly rub on the bottom as it is closed. Closer inspection may reveal that the mitred welds do not line through at the top and the bottom of the lock side of the door to its framework.
If this is the case on any door, then the door will need bringing back to square (called ‘jacking’ in the trade) and it will then need ‘toeing and heeling’ to prevent it from dropping again in the future. If you suspect that your door may have dropped, then the easiest way to check is to measure corner to corner across the diagonals of the door and verify that the measurements are near enough the same, or to within a couple of mm or so. A quarter of an inch difference in measurements is too much!
5. Checking
Make sure all sashes open and close and have been correctly packed. Should an opener not work, then it is likely that it has been incorrectly packed. The unit must be removed, repacked and reinstalled. Failure to do this can result in locks not engaging properly, daylight being seen, a lack of weather protection and possible grating on locks or on the bottom of the sash when closing.
If you find you have any of these problems, please recheck:
• Your installed item is square in the house aperture and is not twisted in any way.
• That its diagonal measurements are equal, both the frame and any sashes.
• The frame has not been stretched by over-tightening the fixing bolts (especially in the door.)
6. Hinge and Other Adjustments
If minor (mm) adjustments are required after toe and heeling, the SFS dynamic 2d hinges fitted to a UPVC door have minor adjustment capabilities.


